SimpleT Email AI
SimpleT Email AI makes email communication with customers easier and more professional by helping you write better emails, translate content between languages, and manage email threads efficiently. Think of it as having a professional writing assistant, translator, and email organizer all built into your case management.
Setup
What This Feature Does
SimpleT Email AI makes email communication with customers easier and more professional by:
- Writing better emails - AI helps improve your writing to sound more professional and clear
- Translating emails - Convert emails between different languages instantly using multiple translation engines
- Managing email threads - View, search, and organize all emails related to a case in one place
- AI-powered assistance - Get help with email replies, summaries, and action items
- Automatic translation - Emails can be translated automatically as they arrive or when you send them
- Multiple translation engines - Choose the best translation service (Google, AWS, DeepL, etc.) for your needs
Think of it as having a professional writing assistant, translator, and email organizer all built into your case management.
How to Use the Email Optimizer
Getting Started
Access the Email Optimizer
- Go to your case record
- Look for the "Email Optimizer" section
- The component shows two main areas: email composition (top) and email history (bottom)
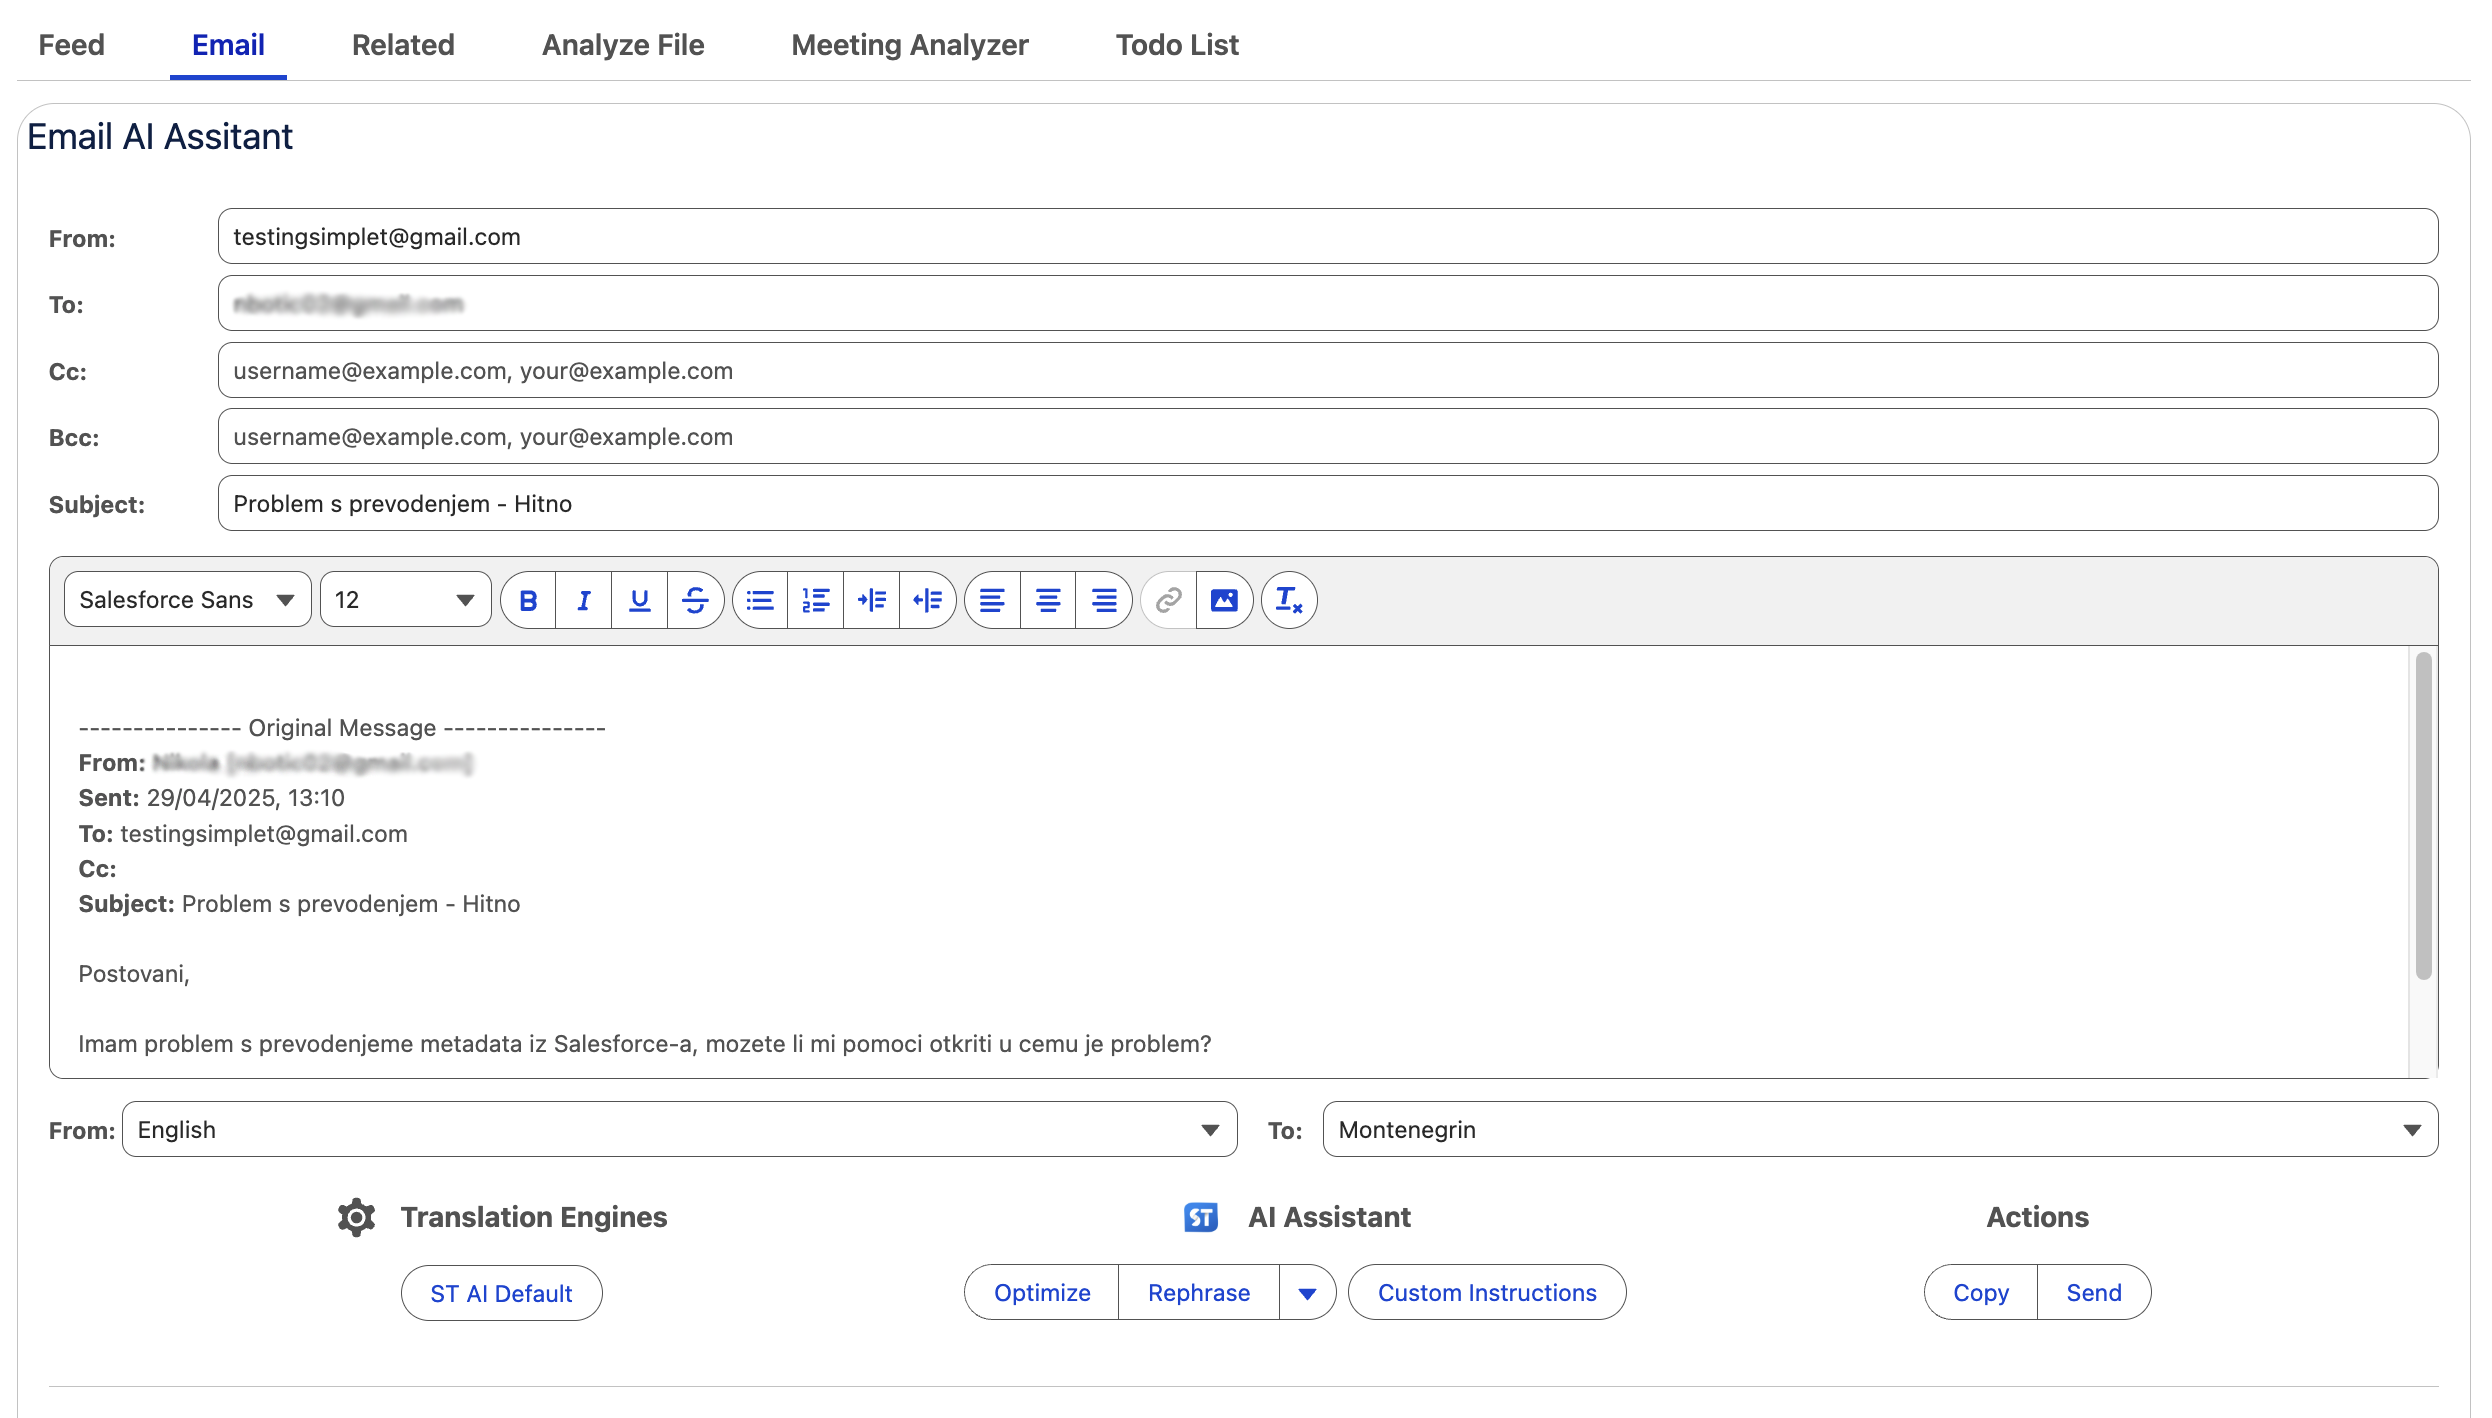
Understanding the Interface
- Email Workbench (top): Where you write and send new emails
- Message History (bottom): Shows all emails related to this case
- Language Controls: Dropdowns to select translation languages
- Engine Selection: Choose which translation service to use
Composing and Sending Emails
Basic Email Composition
- Start Writing
- Type your message in the text area
- Use the rich text editor for formatting (bold, italic, etc.)
- Fill in recipient fields (To, CC, BCC) and subject line
- Choose Recipients
- To: Main recipients of your email
- CC: People who should see the email but aren't the main recipients
- BCC: Hidden recipients (others won't see these addresses)
- From: Your sending email address (usually pre-filled)
Using Translation Features
- Select Languages
- From Language: The language you're writing in
- To Language: The language you want to translate to
- Choose Translation Engine
- Click the "Translate" button
- Select your preferred translation engine:
- ST Google Translate Default
- ST AWS Default
- ST DeepL Default
- ST AI Default
- Translate Your Email
- Write your email in your preferred language
- Click "Translate" and select your engine
- Review the translation that appears below your original text
- Edit the translation if needed
- Send the email with both original and translated versions
Using AI Features
- AI Optimize
- Write your email
- Click "AI Optimize"
- The system will rewrite your email to be more professional and clear
- Review the changes and edit if needed
- AI Rephrase
- Select "Rephrase" from the AI options
- Get alternative wording while keeping the same meaning
- Choose the version you prefer
- AI Shorten
- Select "Shorten" from the AI options
- Get a more concise version of your email
- Perfect for long emails that need to be more direct
- Custom AI Instructions
- Click the settings icon next to AI options
- Add specific instructions like "Use technical terms" or "Be more empathetic"
- Use pre-made templates for common scenarios
Managing Email History
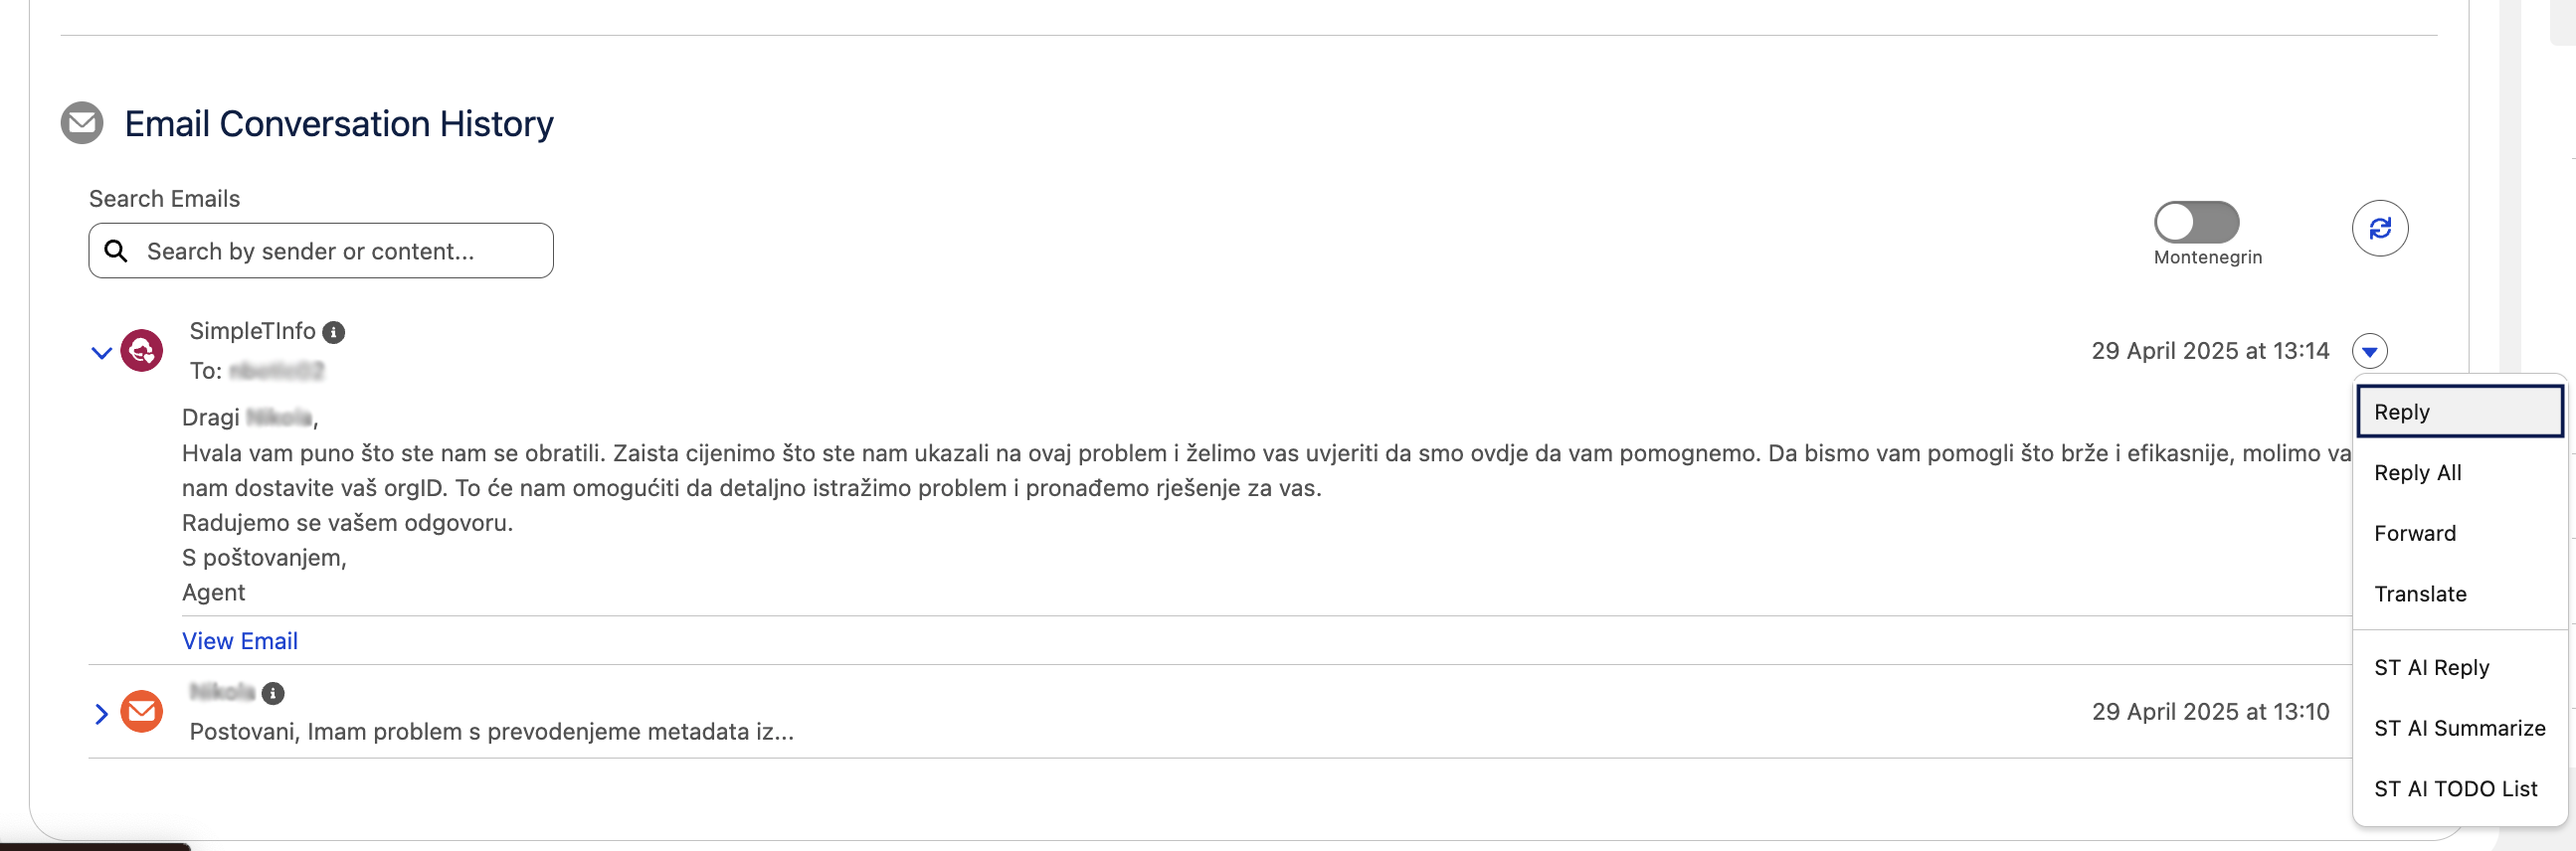
Viewing Email Threads
Browse Messages
- All emails appear in chronological order (newest first)
- See sender, date, and preview of each email
- Incoming emails are marked differently from outgoing ones
Expand/Collapse Messages
- Click on any email to expand and see full content
- Use "Expand All" or "Collapse All" buttons to control all messages at once
- Expanded messages show complete email content and all recipients
Translation Controls for History
View Translations
- Toggle between "Original" and "Translated" views
- Original: Shows emails in their original languages
- Translated: Shows emails translated to your preferred language
Translate Individual Emails
- Click the menu (three dots) on any email
- Select "Translate"
- The translation will be saved and available for future viewing
Email Actions
Reply Options
- Reply: Respond to just the sender
- Reply All: Respond to sender and all recipients
- Forward: Send the email to new recipients
AI-Powered Actions
- AI Reply: Generate a smart response to the email
- Summarize: Get a brief summary of the email content
- TODO List: Extract action items from the email
Give Feedback on AI Features (Optional)
After using any AI features (optimize, translate, reply, etc.), you'll see feedback options to help improve the system for everyone.
Search and Organization
- Use the search box to find specific emails by sender name or content
- Filter through long email threads quickly
- View individual emails in detail by clicking "View"
Step-by-Step Examples
Example 1: Responding to a Customer in Spanish
Situation: Customer sent an email in Spanish, you need to respond professionally.
Steps:
- Look at the email in Message History - it may already be translated if auto-translation is enabled
- Click "Reply" on the customer's email
- Write your response in English in the Email Workbench
- Select "Spanish" as the "To Language"
- Click "Translate" and choose your preferred translation engine (e.g., Google)
- Review the Spanish translation that appears
- If needed, use "AI Optimize" to improve the tone
- Click "Send" - the customer receives the email in Spanish
Result: Professional response sent in the customer's language.
Example 2: Using AI to Handle a Complex Email
Situation: Received a long, complicated customer email with multiple questions.
Steps:
- Find the email in Message History
- Click the AI menu (robot icon) and select "Summarize"
- Read the AI-generated summary to understand key points
- Click "AI Reply" to get a draft response
- Review the AI-generated reply
- Use "AI Optimize" with custom instructions like "Be more empathetic"
- Edit the response as needed
- Translate if the customer uses a different language
- Send the completed response
Result: Comprehensive, professional response created efficiently.
Example 3: Setting Up Automatic Translation
Situation: You handle many international customers and want emails translated automatically.
Steps:
- Work with your administrator to enable automatic translation
- When enabled, incoming emails will automatically appear translated in your language
- When you compose replies, they can be automatically translated to the customer's language
- Both original and translated versions are saved for reference
- You can still manually translate or use different engines when needed
Result: Seamless multilingual communication without manual translation steps.
Common Questions and Answers
About Using the Feature
Q: Do I have to use the AI and translation features?
A: No, they're optional! You can write and send emails normally. The AI and translation features are there to help when you need them.
Q: Can I edit AI suggestions and translations?
A: Yes! Always review and edit AI suggestions and translations before sending. You have full control over the final message.
Q: What if a translation is wrong?
A: You can edit the translation before sending, try a different translation engine, or let your administrator know about persistent issues.
About Translation Engines
Q: Which translation engine should I use?
A: It depends on the languages involved:
- ST Google Translate Default
- ST DeepL Default
- ST AWS Default
- ST AI Default
Q: Why don't I see all translation engines?
A: The system only shows engines that support your selected language pair. Some engines work better with certain languages.
Q: Can I set a default translation engine?
A: The system remembers your last choice, but you can change engines anytime based on your needs.
About AI Features
Q: How accurate are AI suggestions?
A: AI suggestions are helpful starting points, but always review them. The AI learns from your feedback, so rate suggestions to help improve them.
Q: Can I give the AI specific instructions?
A: Yes! Click the settings icon next to AI options to add custom instructions like "Use technical language" or "Be more formal."
Q: What does "AI Optimize" do exactly?
A: It improves your email's clarity, professionalism, grammar, and tone while keeping your original meaning.
Troubleshooting
Q: I don't see the translation or AI buttons
A: These features might not be enabled for your profile. Contact your administrator about accessing these features.
Q: The translation seems to be taking a long time
A: Translation and AI processing can take a few moments. Look for the loading indicator and wait for it to complete.
Q: I can't send emails
A: Check that you have permission to send emails from cases and that all required fields (To, Subject) are filled in.
Tips for Best Results
Writing Tips
- Be clear and specific about what you need from the customer
- Use simple sentences for better translation accuracy
- Include context so recipients understand the situation
- Proofread before sending, especially translated content
Translation Tips
- Write naturally first, then translate - don't try to write for translation
- Avoid idioms and slang that might not translate well
- Review translations carefully - machines aren't perfect
- Test different engines for different language pairs to find what works best
AI Usage Tips
- Start with your natural writing - AI works better when you write normally first
- Use custom instructions for specific situations or tone requirements
- Combine AI features - use AI Reply, then AI Optimize, then translate
- Provide feedback on AI suggestions to help improve the system
Getting Help
If you need help with the Email Optimizer:
- Check this guide first for common questions and procedures
- Try different approaches - if one translation engine doesn't work well, try another
- Ask a colleague who has experience with the feature
- Contact your administrator for technical issues, feature access, or configuration changes
- Provide feedback on AI and translation quality to help improve the system
Remember: This tool is designed to make your job easier, not more complicated. Start with basic features and gradually explore advanced options as you become more comfortable.
Properties explanation
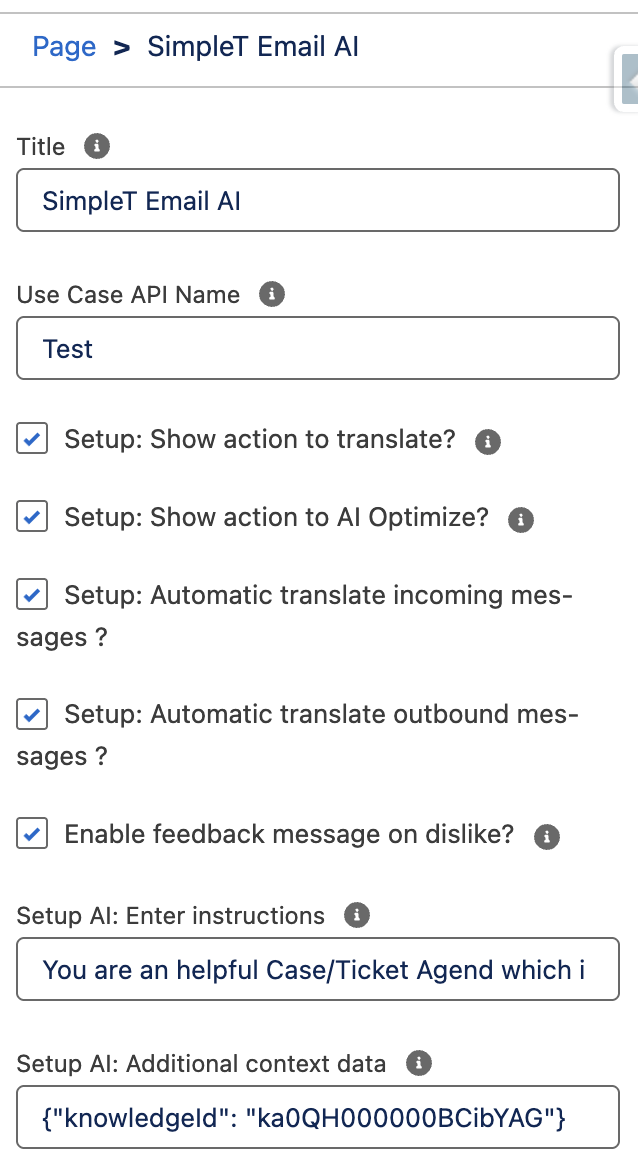
Record Page Properties:
- Title
Enter the title for the component. - Use Case API Name
The API Name of the Use Case created in the Simple Translate app under the AI Command Center section. This allows you to track all previous executions and debug what happened. - Setup: Show action to translate?
Select the checkbox to display the translate button on the component (default: true). - Setup: Show action to AI Optimize?
Select the checkbox to display the AI Optimize button on the component (default: true). - Setup: Automatic translate incoming messages?
Select the checkbox to automatically translate incoming messages (default: true). - Setup: Automatic translate outbound messages?
Select the checkbox to automatically translate outbound messages (default: true). - Enable feedback message on dislike?
Select the checkbox to enable entering a message when the dislike button is pressed (default: true). - Setup AI: Enter instructions
Instructions or guidance that the AI assistant should follow when processing the request. Option 1: Reference a Prompt Builder API Name defined in the Simple Translate app under the Prompt Builder section by using the input format {{?PROMPTAPINAME}}. Option 2: Provide manual instructions typed directly here. You can also include object fields or related object fields(e.g., CustomField__c, CustomObject__r.CustomField__c). - Setup AI: Additional context data
Additional data in Json format that will be available in the prompt builder to help generate more accurate prompts.